Anchoïade: Anchovy Cream

AnchovyPaste-126R0083.jpg

Each day in cooking class we prepare at least one or two appetizers, a sign that it’s time to open a bottle of wine and relax. And this is a perennial favorite. Throughout Provence anchoïade (anchovy cream) is a popular starter, often used as a dip for a selection of raw vegetables. Recipes vary dramatically from cook to cook and I like to keep mine simple, with just a trio of ingredients: top-quality anchovy fillets cured in olive oil, capers, and cream.

Makes 1/2 cup (125 ml) 

Equipment

A mini food processor or a standard food processor fitted with a small bowl.

INGREDIENTS

One 2.82-ounce (80 g) jar Italian anchovy fillets in olive oil (about 20 fillets)
1 tablespoon capers in vinegar, drained
1/4 cup (60 ml) light cream

METHOD

Combine the ingredients in the bowl of the food processor or a blender and process to a chunky consistency. Use as a dip for raw vegetables, to prepare Anchovy Bites (recipe in The French Kitchen Cookbook), or as a sandwich spread.

(Store in an airtight container in the refrigerator for up to 3 days.)


This recipe was first published in The French Kitchen Cookbook. All rights reserved. Please do not reproduce without permission.

Eggplant in Spicy Tomato Sauce with Feta

EggPlant-_MG_0208.jpg

Until I began growing eggplant, I had no idea how vibrant, smoky, and intense it could be, so fresh and firm, picked just seconds before preparation. Come August, my garden flourishes with those shiny black, lean and long vegetables, hanging from their neat little tree-like plants, ready for the oven, the skillet, the grill. I like to harvest them small, when I feel the flavor is more intense. This roasted eggplant buried in a spicy tomato sauce is a personal favorite, with multiple variations. I like to serve it as a vegetarian main dish, sometimes showered with cubes of feta cheese and warmed just until the cheese begins to melt. The dish could also serve as a pasta sauce: chop the eggplant as it comes from the oven, then drop the cubes into the tomato sauce. Cumin, ginger, and pepper flakes have their place here as model partners to the versatile eggplant.

8 servings

Equipment

A baking sheet; a large, deep skillet with a lid.

INGREDIENTS

4 small, firm, fresh eggplants (each about 8 ounces; 250 g), washed but not peeled
2 tablespoons extra-virgin olive oil
1 teaspoon fine sea salt
2 onions, peeled, halved, and thinly sliced
6 plump, fresh garlic cloves, peeled, halved, and green germ removed
2 tablespoons finely slivered fresh ginger
1/4 teaspoon red pepper flakes, or to taste
2 teaspoons ground cumin, toasted
One 28-ounce (794 g) can diced Italian tomatoes in juice
1 cup (125 g) Greek feta cheese, cubed (optional)

METHOD

1. Center a rack in the oven. Preheat the oven to 425°F (220°C). 

2. Trim and discard the stem ends of the eggplants. Halve them lengthwise. Brush the flesh lightly with some of the oil and season lightly with salt. Place the eggplant halves, cut side down, on a baking sheet. Place in the oven and bake until the eggplant skin is soft and wrinkled and the cut side is golden, about 30 minutes.

3. When the eggplants have almost finished cooking, prepare the sauce: In the skillet, combine the onions, garlic, the remaining oil, and salt to taste. Toss to thoroughly coat the onions and garlic with the oil, and sweat – cook, covered, over low heat until soft and translucent – about 5 minutes. Add the ginger, pepper flakes, and cumin, and toss to evenly coat the onions. Add the tomatoes with juices and simmer, covered, for about 5 minutes.

4. Add the roasted eggplant halves, burying them, cut side down, in the sauce. Cover and cook until the eggplant is very tender and has absorbed much of the sauce, about 20 minutes. If using, add the cubes of feta cheese, warming the dish until the cheese melts. Taste for seasoning. Serve.


This recipe was first published in The French Kitchen Cookbook
All rights reserved. Please do not reproduce without permission.

Walter's Salt + Pepper Steak

WaltersSaltPepperSteak-_MG_1671.jpg

I am not sure why, but a thick, juicy côte de boeuf calls for a party: a simple but festive meal enjoyed with friends around the table, a sturdy red wine, and a simple green salad. This recipe demands no more gadgetry than a well-seasoned skillet. Walter remembers watching his father cook steaks, and he always heated coarse sea salt and waited until it “danced” before cooking the meat. It’s an uncomplicated but sure-fire way to ensure a thick, flavorful crust on one of our favorite cuts of meat.

4 servings

EQUIPMENT

A griddle, seasoned cast iron skillet, or heavy-duty skillet.

INGREDIENTS

1 bone-in beef rib-eye steak, about 2 pounds (1 kg), about 1-inch (2.5 cm) thick
2 tablespoons coarse sea salt
Coarse, freshly ground black pepper
Fleur de sel
Lemon wedges, for serving  


METHOD

1.    Remove the meat from the refrigerator at least 4 hours before cooking.

2.    When you are ready to cook the beef, preheat the griddle or skillet over high heat for 2 minutes. Scatter the coarse sea salt on the griddle and heat until the salt “dances,” or begins to pop, about 3 minutes. Then add the meat, unseasoned, and cook for 4 minutes on one side. Turn the meat, season the seared side with pepper and cook for 4 minutes more for rare meat, or cook to desired doneness.

3.    Transfer the meat to a cutting board. Season the second side with pepper and season both sides with fleur de sel. Tent the meat loosely with foil to prevent the surface from cooling off too quickly. Let it rest for 5 to 10 minutes.

4.    To serve, carve into thick slices. Serve with lemon.

THE SECRET

Three rules here: sear, season, rest. Searing caramelizes the sugar and browns the proteins on the surface of the meat, resulting in more intense flavors and an attractive crust. The salt does help begin to season the meat, but because the pan is extremely hot, the meat begins to sear immediately, forming a crust that prevents the salt from drawing moisture from the steak. The final seasoning makes for meat that tastes seasoned not salted. Resting allows the juices to retreat back into the meat, resulting in beef that is moist and tender, not dry.

Wine Suggestion

Bring out a sturdy red that will stand up to the forward flavors of well-cooked beef. With this meat I like to uncork our winemaker Yves Gras’s stellar cuveé, Gigondas Prestige des Hautes Garrigues. The wine is a blend of 80 percent old-vine Grenache, 15 percent Mourvedre, 3 percent Syrah, and 1 percent Cinsaut. It’s aged for 2 years in oak barrels and oak tanks, and bottled without filtration. A perfect match for a perfectly cooked steak.


This recipe was first published in The French Kitchen Cookbook. All rights reserved. Please do not reproduce without permission.


Seared Duck BreaSt with Fresh Figs + Black Currant Sauce

DuckBreastFigsCassis-_DS_7789.jpg

This is a “Monday night special” in our cooking class in Provence. Our local butcher supplies the most delicious, meaty duck breasts, and a variety of fresh figs are in season from June to October. This super-easy all-purpose sauce could also be used on any grilled or roasted poultry. I use a good-quality balsamic vinegar here, but nothing super-thick or aged. Two brands that I most respect are Rustichella d’Abbruzzo and Leonardi.

4 servings

EQUIPMENT

A warmed platter; 4 warmed dinner plates.

INGREDIENTS

16 fresh figs
2 fatted duck breasts (magret), each about 1 pound (500 g)
Fine sea salt
Coarse, freshly ground black pepper
1/2 cup (125 ml) best-quality balsamic vinegar (see Note)
1 cup (250 ml) crème de cassis (black currant liqueur) or black currant juice


METHOD

1.    Stand each fig, stem end up, on a cutting board. Trim off and discard the stem end of the fig.  Make an X-shaped incision into each fig, cutting about one-third of the way down through the fruit.
2.    Remove the duck from the refrigerator 10 minutes before cooking. With a sharp knife, make about 10 diagonal incisions in the skin of each duck breast. Make about 10 additional diagonal incisions to create a crisscross pattern. The cuts should be deep, but should not go all the way through to the flesh. (The scoring will help the fat melt while cooking and will stop the duck breast from shrinking up as it cooks.) Season the breasts all over with salt and pepper. 

3.    Heat a dry skillet over medium heat. When the pan is warm place the breasts, skin side down, in the pan. Reduce the heat to low and cook gently until the skin is a uniform, deep golden brown, about 3 minutes. Carefully remove and discard the fat in the pan.  Cook the breasts skin side up for 10 minutes more for medium-rare duck, or cook to desired doneness.
4.    Remove the duck from the skillet and place the breasts side-by-side on the warmed platter. Season generously with salt and pepper. Tent loosely with foil and let the duck rest for at least 10 minutes, to allow the juices to retreat back into the meat.
5.    In a small saucepan, combine the vinegar and the crème de cassis, and warm over low heat.

6.    In a saucepan that will hold the figs snugly, arrange them tightly in a single layer, cut end up. Pour the warm vinegar mixture over the figs and cook over low heat, basting the figs with the liquid, for about 3 minutes.  
7.    Cut the duck breasts on the diagonal into thick slices, and arrange on the warmed dinner plates. Spoon the sauce over the duck slices, and arrange the figs alongside. Serve. 
 

WINE SUGGESTIONS

Almost any good southern Rhône red would be perfect here. Cassis is an overriding flavor in the wines of the region; try the Côtes-du-Rhône- Villages Cairanne from the Domaine de l’Oratoire Saint Martin, the Réserve des Seigneurs, loaded with the spice of red and black currants as well as kirsch. 

 
VARIATION

Substitute cherries for the figs, and Cherry eau-de-vie for the crème de cassis. 


This recipe was first published in The French Kitchen Cookbook. All rights reserved. Please do not reproduce without permission.

Spaghetti with Pecorino + Pepper: Cacio e Pepe

SpaghettiPecorinoPepper-_DS_6192.jpg

Sitting on the terrace of the bustling Roman trattoria Dal Bolognese one sunny Sunday in May, I relished a version of this classic dish, pungent with freshly ground black pepper and enriched with a mixture of sheep’s milk Pecorino cheese and Parmigiano-Reggiano. We were dining with our friends George Germon and Johanne Killeen, and George noted that this is one of the hardest pastas to get right, probably because it is so basic and appears easy. The pepper flavor should be dominant, but should not overwhelm the palate. We eat pasta at least once a week, and this is one of my “Go To” preparations, since it goes together in a matter of minutes and is such a thoroughly satisfying dish.

4 servings

EQUIPMENT

A 10-quart (10 l) pasta pot fitted with a colander; 4 warmed, shallow soup bowls.

INGREDIENTS

3 tablespoons coarse, freshly ground black pepper, preferably Tellicherry
2 tablespoons extra-virgin olive oil
2 tablespoons (30 g) salted butter
3 tablespoons coarse sea salt
1 pound (500 g) Italian spaghetti
3/4 cup (50 g) freshly grated Pecorino-Romano cheese, plus extra for serving
3/4 cup (75 g) freshly grated Parmigiano-Reggiano cheese, plus extra for serving


METHOD

1.    Place the pepper in a large skillet over a medium heat and toast it, shaking the pan, until fragrant, about 30 seconds. Add the oil and the butter and stir until the butter is melted. Remove from the heat.

2.    In the pasta pot, bring 8 quarts (8 l) of water to a rolling boil over high heat. Add the salt and the pasta, stirring to prevent the pasta from sticking. Cook until tender but firm to the bite. Remove the pasta pot from the heat. Remove the colander and drain the pasta over the sink, shaking to remove the excess water. Reserve some of the cooking water for the sauce.

3.    Return the skillet to the heat. Add about 4 tablespoons of the pasta water to the oil mixture and stir to blend. Add the pasta and toss until it is evenly coated. Add the cheeses and toss until the pasta is evenly coated. If the pasta is dry, add more pasta water. Serve immediately, with additional grated Pecorino and Parmigiano on the side.

THE SECRET

Buy the best peppercorns you can find. I favor the highly aromatic Tellicherry pepper from Malabar, off the coast of India, and love its spiciness, hint of wood, and lingering scent. The berries are left on the vines a bit longer, so they develop a deep, rich flavor. The peppercorns from The Spice House (thespicehouse.com) are fabulous and reliable. And do invest in a good pepper mill, one that will coarsely grind the peppercorns. I use a battery-powered Peugeot mill. Peugot mills are readily available in gourmet shops. (Note I have no affiliation with these brands, they are just the ones I like and chose to use in my kitchen).


This recipe was first published in The French Kitchen Cookbook: Recipes and Lessons from Paris and Provence. All rights reserved. Please do not reproduce without permission.


Penne with Tomatoes, Rosemary, Olives, Artichokes + Capers

PizzaPastaTomOliArtCap-_DS_6262.jpg

There are evenings when I crave pizza but don’t have the time to prepare it. That’s when I turn to this pasta dish, one that has all my favorite pizza toppings turned into a sauce, which I affectionately call Pizza Pasta. Penne is the preferred pasta here, for it’s sturdy enough to stand up to the rustic trimmings.

6 servings

EQUIPMENT

A 10-quart (10 l)  pasta pot fitted with a colander; 6 warmed, shallow soup bowls.

INGREDIENTS

3 tablespoons course sea salt
1 pound (500 g) Italian penne pasta
2 cups (500 ml) tomato sauce or one 28-ounce (794 g) can diced Italian tomatoes in juice
1 tablespoon finely minced fresh rosemary
1/2 cup (60 g) best-quality brine-cured black olives, pitted and halved lengthwise
12 artichoke hearts marinated in olive oil, drained and cut into bite-size pieces  
1/2 cup (60 g) capers in vinegar, drained
1 teaspoon fennel seeds
8 ounces (250 g) Italian whole-milk mozzarella, torn into bite-size pieces
4 tablespoons fresh basil leaves, torn
Hot red pepper flakes, for serving

METHOD

1.     In the pasta pot, bring 8 quarts (8 l) of water to a rolling boil over high heat.  Add the salt and the pasta, stirring to prevent the pasta from sticking. Cook until tender but firm to the bite.

2.     Meanwhile, in a saucepan that is large enough to hold the cooked pasta, combine the tomatoes sauce or canned tomatoes, rosemary, olives, artichokes, capers and fennel seeds. Simmer while the pasta is cooking.

3.     When the pasta is cooked, remove the pot from the heat. Remove the colander and drain the pasta over the sink, shaking to remove the excess water. Immediately transfer the drained pasta to the sauce in the saucepan. Toss to evenly coat the pasta. Cover and let rest for 1 to 2 minutes to allow the pasta to thoroughly absorb the sauce. Taste for seasoning. Transfer to the warmed soup bowls, and garnish with the cheese and basil. Pass the red pepper flakes.

WINE SUGGESTION

A favorite household red is the inky-purple Vacqueyras, the southern Rhône wine from Domaine des Amouriers. Their Les Genestes is a typical blend of Grenache, Syrah, and Mourvedre, with lots of spice that marries well with this pasta dish.


This recipe was first published in The French Kitchen Cookbook. All rights reserved. Please do not reproduce without permission.

Golden Almond-Crusted Sole Fillets

MiniPalaisFishFilAlmds-_DS_7747.jpg

I first sampled this fish one sunny day in June, on the magical terrace of Mini Palais, the restaurant situated inside the Grand Palais museum in Paris. This is such an easy, quick, delicious dish and one that we have often made in class: The entire dish can be prepared several hours in advance and one can easily adjust the number, baking enough fillets to serve two or twenty!

4 servings

EQUIPMENT

A baking sheet lined with baking parchment.

INGREDIENTS

4 tablespoons (60 g) unsalted butter
4 tablespoons (30 g) almond meal (see Notes)
Fine sea salt
Coarse, freshly ground black pepper
8 fresh white-fleshed fish fillets, about 3 ounces (90 g) each (see Note) 
1/2 cup (40 g) sliced almonds

NOTES

•    Almond meal (sometimes called almond flour) is made from blanched or unblanched (skin-on) almonds. For this recipe, whole, unblanched almonds can be finely ground in a food processor or an electric spice mill. Do not over-process or you may end up with almond butter.

•    Any firm, white-fleshed fish fillets can be used here, such as halibut, flounder, trout, or perch. 
 

METHOD

1.    In a small pan, melt the butter. Remove from the heat and stir in the almond meal. Season with salt and pepper and stir again. Set aside to cool at room temperature until the mixture hardens and spreads easily. about 1 hour. (Do not refrigerate. The mixture may become too firm to spread.)

2.    Center a rack in the oven. Preheat the oven to 400°F (200°C).

3.    Place the fillets side by side on the baking sheet. Season with salt and pepper. 

4.    Spread the cooled almond butter over the fillets. Cover the paste with a layer of sliced almonds. Place in the oven and bake the fillets for 4 minutes. To test for doneness, pierce a fillet with a knife set at a 45-degree angle. The fish should be opaque and flake easily. If the almonds are not sufficiently colored, place the fillets under the broiler until golden. Serve immediately.
 

WINE SUGGESTION

On that golden day we sampled the golden white from winemaker Olivier Merlin: His Macon la Roche Vineuse is pure, mineral-rich, a pleasure, and a fine match for this almond-flecked fish dish. 


This recipe was first published in The French Kitchen Cookbook. All rights reserved. Please do not reproduce without permission.

Zucchini Carpaccio with Avocados, Pistachios + Pistachio Oil


Recipe demonstration begins at 32:18.


Neither my students nor I ever tire of this salad. It has all the qualities one looks for in a dish: crunch, smoothness, color, aroma. Serve with Crispy Flatbread (page 260 of Salad as a Meal), Tortilla Crisps (page 263 of Salad as a Meal) or toasted bread for added crunch. Don’t omit the fresh thyme here, for it plays an essential role in the color and aroma. 

4 servings 


Equipment

A small jar with a lid; a mandoline or a very sharp knife.  

Ingredients

1 tablespoon freshly squeezed lemon juice
1/4 teaspoon Lemon Zest Salt
3 tablespoons best-quality pistachio oil (such as Leblanc) or extra-virgin olive oil
4 small, fresh zucchini (about 4 ounces; 115 g each) trimmed at both ends
1 large, ripe avocado
1/2 cup salted pistachios  
4 fresh lemon thyme sprigs, with flowers if possible

Fleur de sel

Method

1.  In the jar, combine the lemon juice and flavored salt. Cover with the lid and shake to blend. Add the oil, and shake to blend. 

2.  With a mandoline or sharp knife, slice the zucchini lengthwise as thin as possible. Arrange the slices on a platter, and pour the dressing over them. Tilt the platter back and forth to coat the slices evenly. Cover with plastic wrap and let marinate at room temperature for 30 minutes, so the zucchini absorbs the dressing and does not dry out.

3.  Halve, pit, and peel the avocado, and cut it lengthwise into very thin slices. Carefully arrange the slices of marinated zucchini on individual salad plates, alternating with the avocado slices, slightly overlapping them.  Sprinkle with the pistachio nuts. Garnish with the thyme sprigs and flowers and fleur de sel.  Serve.

Wine suggestion

Favorite wine partners for avocado include a young Pinot Grigio, a crisp-style Chardonnay, and a fragrant, well-chilled Sauvignon Blanc.


This recipe was first published in Salad as a Meal
All rights reserved. Please do not reproduce without permission.

Lemon Olive-Oil Dressing

kitchen_salad dressing JK.jpg

Makes about 1 1/4 cups (310 ml)


Equipment

A small jar with a lid.

Ingredients

1/4 cup (60 ml) freshly squeezed lemon juice
Fine sea salt    
1 cup (250 ml) extra-virgin olive oil

Method

Place the lemon juice and salt in the jar. Cover and shake to dissolve the salt. Add the oil and shake to blend. Taste for seasoning. (Store in the refrigerator for up to 1 week.) Shake again at serving time to create a thick emulsion.


These recipes were first published in The French Kitchen Cookbook
All rights reserved. Please do not reproduce without permission.

Heirloom Tomato Platter

Tomato salad platter JK.jpg

In summer, if the conditions are right, my vegetable garden will usually produce enough heirloom tomatoes to feed an army. Among my preferred varieties are kaki coing, black prince, noire de crimée, and striped germain with their dramatic colors and gentle acidity. But whether market bought or from my homegrown bounty, this simple platter is a favorite way to enjoy a tomato's fresh juicy sweetness. Here I have topped the tomato slices with ruffles of the firm Swiss cheese Tête de Moine, shaved with a special machine called a girolle, but any cheese of choice can be used here.

6 servings


Equipment

A cheese girolle, a mandolin or a very sharp knife; a large serving platter.

Ingredients

6 ripe heirloom tomatoes (about 1 1/4 pounds; 625 g), preferably of varied colors
6 thin ruffles of Tête de Moine cheese, created with a cheese girolle or cut into paper-thin slices with a mandoline or a very sharp knife.
A handful of fresh herbs, such as green basil, purple basil, shiso and Delfino cilantro, rinsed and patted dry
About 2 tablespoons Lemon-Olive Oil Dressing

Fleur de sel

Method

Arrange the tomatoes in overlapping layers on the serving platter. Garnish with the cheese and herbs. Drizzle the dressing over all and season lightly with fleur de sel.


This recipe was first published in The French Kitchen Cookbook
All rights reserved. Please do not reproduce without permission.

Kumquat Conserve

KumquatBldOrangeConserve-_DS_5494.jpg

My faithful little kumquat tree in Provence produces a year-round supply of these beautiful golden nuggets, giving me ample opportunity to make this tangy jam-like conserve that pairs wonderfully with fresh goat's milk cheese. It's always nice to have a supply in the pantry to take as a host gift when going to a dinner party, or to give to friends who come to stay.

Makes 1 quart (1 l)  


Equipment

Eight 1/2-cup (125 ml) canning jars with lids.


Ingredients

1 1/2 pounds (750 g) unblemished fresh kumquats
2 cups (500 ml) fresh blood orange, mandarin orange, or regular orange juice
1 cup (200 g) unrefined cane sugar, preferably organic, vanilla scented

Method

1.  Stem the kumquats, halve them lengthwise, and remove and discard the seeds.

2.  In a large saucepan, combine the kumquats, orange juice, and sugar. Bring to a simmer and simmer, skimming the surface as needed, until the juice is thick and the kumquats are soft and translucent, about 1 hour. Skim off and discard any recalcitrant seeds that float to the surface. Let cool.

3.  Transfer to the canning jars and secure the lids. (Store in the refrigerator for up to 2 weeks.)


This recipe was first published in The French Kitchen Cookbook
All rights reserved. Do not reproduce without permission.

Lemon Zest Salt

Zesty Lemon Salt.jpg

Before using a lemon, I always zest it. If I am not using the zest in the recipe I am making, I like to turn it into lemon zest salt, that I can use on virtually any dish to add color, texture, and well, a little zest! The recipe couldn't be easier:


Makes 2 tablespoons

Equipment

A spice grinder; a small jar with a lid

Ingredients

1 tablespoons grated lemon zest, preferably organic (as non-organic lemon skins are heavily sprayed with pesticides)
1 tablespoon fine sea salt


Method

Combine the zest and the salt in the spice grinder and grind to a fine powder. Transfer to a small jar and close with the lid. Keep refrigerated for up to a week (after that the lemon flavor begins to fade)

If you don't have a spice grinder, you can use a well-cleaned coffee grinder, or zest the lemon finely with a very sharp fine zester such as a microplane zester, and stir to combine.


This recipe was first published in Salad as a Meal.
All rights reserved. Do not reproduce without permission.

Yogurt-Lemon Dressing

Makes about 3/4 cup

Equipment

 A small jar, with a lid.   

Ingredients

1/2 cup plain low-fat yogurt
2 tablespoons freshly squeezed lemon juice
1/4 teaspoon Lemon Zest Salt or fine sea salt

Method

In the jar, combine the yogurt, lemon juice and salt. Cover with the lid and shake to blend. Taste for seasoning.  The dressing can be used immediately. (Store the dressing in the refrigerator for up to 1 week. Shake to blend again before using.)  


This recipe was first published in Salad as a meal
All rights reserved. Please do not reproduce without permission.

Cobb Salad

My Cobb Salad.jpg

In mid summer, it is a fresh, crunchy salad that will get me through the day. This American classic is a favorite with the crunch of the iceberg and scallions, the soft richness of the avocado, the saltiness of the bacon, the sweetness of the tomato, the bite of the blue cheese – this salad has it all!  And it is beautiful to boot.

4 servings

Ingredients

2 1/2 ounces smoked bacon, rind removed, cut into matchsticks (3/4 cup)
1 head iceberg lettuce, chopped
2 ripe heirloom tomatoes, cored, , peeled, seeded and chopped
1 large, ripe avocado, halved, pitted, peeled, and cubed
4 ounces chilled blue cheese (preferably Roquefort), crumbled (1 cup)
4 small spring onions or scallions, white part only, trimmed, peeled and cut into thin rounds
Lemon-Yogurt Dressing
Coarse, freshly ground black pepper

Method

1.  In a large, dry skillet, brown the bacon over moderate heat until crisp and golden, about 5 minutes. With a slotted spoon, transfer the bacon to several layers of paper towel to absorb the fat. Blot the top of the bacon with several layers of paper towel to absorb any additional fat. Set aside.

2.  In a large shallow bowl, combine the bacon, lettuce, tomatoes, avocado, blue cheese, and spring onions. Toss with just enough Lemon-Yogurt Dressing to lightly and evenly coat the ingredients. Season with plenty of coarse, freshly ground black pepper and serve.


This recipe was first published in Salad as a Meal
All rights reserved. Please do not reproduce without permission.

Vanilla Sugar

VanillaSugar-_DS_6418.jpg

Never discard vanilla beans, for once you have extracted the flavorful seeds from the pods, they can always be used to prepare this quick vanilla sugar, which you can use in any desserts that call for sugar.

Makes 4 cups (800 g)

Equipment

A jar with a lid.

Ingredients

4 plump, fresh vanilla beans, or 4 pods with seeds previously removed
4 cups (800 g) sugar


Method

Flatten the beans and cut lengthwise in half. With a small spoon, scrape out the seeds and place them in a small bowl. Reserve the seeds for preparing any vanilla-flavored dessert. Combine the pods and sugar in a jar. Tighten the lid of the jar. Store at room temperature for 1 month for good vanilla flavor, topping off with sugar as needed.

Manchego, Chorizo + Paprika Bread

ChorizoManchegoBrd-_MG_0790.jpg

This quick bread takes you on an instant trip to Spain. I love this sliced and toasted, with more cheese and chorizo on top as a welcome snack.

Makes 1 loaf (24 thin slices)


Equipment

A nonstick 1-quart (1 l) rectangular bread pan.

Ingredients

Oil, for oiling the pan
1 1/4 cups (180 g) unbleached, all-purpose flour
2 teaspoons baking powder
1/2 teaspoon fine sea salt
3 large eggs, preferably organic and free-range, lightly beaten
1/3 cup (80 ml) extra-virgin olive oil
1/3 cup (80 ml) plain whole-milk yogurt
5 ounces (150 g) Spanish Manchego cheese, cut into 1/4-inch (1/2 cm) cubes
2 ounces (60 g) Spanish chorizo, cut into 1/4-inch (1/2 cm) cubes
1 teaspoon hot Spanish paprika
20 pimento-stuffed green olives

Method

1.  Center a rack in the oven. Preheat the oven to 400°F (200°C). Lightly oil the pan.

2.  In a large bowl, combine the flour, baking powder, and salt. Mix to blend. In another bowl whisk together the eggs, oil, and yogurt.  In a third bowl, toss together the cheese, chorizo, paprika, and olives. Add the egg mixture to the flour mixture and stir to blend. Add the cheese mixture to the flour mixture and stir to blend. Add the cheese mixture and stir to blend.

3.  Pour the batter into the prepared pan. Smooth out the top with a spatula. Place the pan in the oven and bake until the bread is firm and golden, 25 to 30 minutes. Remove from the oven and place the pan on a rack to cool. Once it has cooled, unmold and serve it at room temperature, in thin slices.

Variations

Omit the cheese and chorizo and replace them with 1 tablespoon toasted ground cumin and 1 tablespoon toasted whole cumin seeds; or, for Curry Bread, omit the cheese and chorizo and replace with 1 tablespoon Homemade Curry Powder (page 282 of The French Kitchen Cookbook).


This recipe was first published in The French Kitchen Cookbook: Recipes and Lessons from Paris and Provence.

All rights reserved. Please do not reproduce without permission.

Quick Whole Wheat Bread Tart Dough

Dough JK.jpg

Makes one 12-inch (30 cm) pizza or flatbread


Equipment

A food processor.

Ingredients

3/4 cup (120 g) whole wheat flour
3/4 cup (120 g) bread flour, plus extra if needed for dusting
1 package (2 1/4 teaspoons) quick-rising yeast
3/4 teaspoon fine sea salt
1/4 teaspoon sugar
2 teaspoons extra-virgin olive oil

Method

In the bowl of a food processor combine the whole wheat flour, bread flour, yeast, salt, and sugar and pulse to mix. Combine 1/2 cup (125 ml) of hot water and the olive oil in a measuring cup. With the motor running, gradually add enough of the hot liquid for the mixture to form a sticky ball. The dough should be soft. If it is too dry, add 1 to 2 tablespoons of water. If it is too sticky, add 1 to 2 tablespoons of flour. Process until the dough forms a ball. Transfer to a clean, floured surface and knead by hand for 1 minute. Cover with a cloth and let rest for at least 10 minutes before rolling. (The dough will keep, covered and refrigerated,  for up to 4 days. Punch down the dough as necessary).


These recipes were originally published in Salad as a Meal.
All rights reserved. Please do not reproduce without permission.

Flammekeuchen: Alsatian Bacon + Onion Tart

Alsatian onion and bacon tart JK.jpg

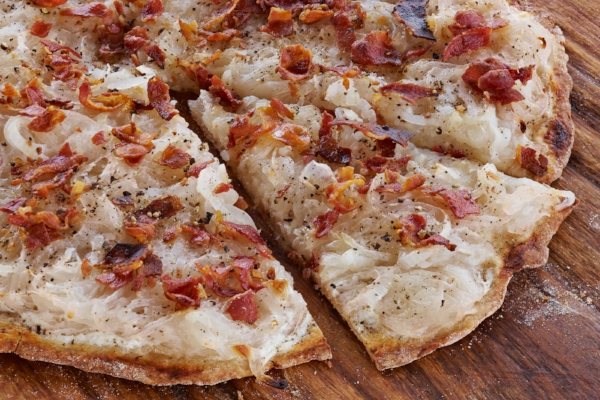
It’s no secret that I love making pizza, and Flammekuechen, the Alsatian version of a thin-crust pizza made with cream, onions and bacon, is a favorite, to bake in my wood-fired oven now that winter is really here.

In this version I have lightened the recipe by replacing the traditional cream with non-fat yogurt or fromage blanc and steaming the onions instead of sweating them in fat. However, on a chilly night you might just feel like adding back the cream and sweated onions! Serve with a green salad and a class of chilled Riesling and transport yourself to Alsace!

Makes 1 12-inch tart


Equipment

A baking stone; a steamer; a wooden pizza peel; a metal pizza peel or large metal spatula (If you don’t have a baking stone and a wooden peel, simply sprinkle the polenta on a baking sheet, place the round of dough on top, assemble the tart, and bake on the baking sheet).

Ingredients 

8 ounces (250 g) large white onions, peeled and cut crosswise into very thin rounds
4 ounces (125 g) thinly sliced pancetta or bacon, cut into cubes
1/2 cup (150 g) nonfat Greek-style yogurt or fromage blanc
1/8 teaspoon freshly grated nutmeg
Flour and polenta for dusting
1 recipe Quick Whole Wheat Bread Tart Dough, shaped into a ball
Coarse, freshly ground black pepper

Method

1.  Place the baking stone on the bottom rack of the oven. Preheat the oven to 500°F (260°C)

2.  Separate the onions into rings. You should have about 4 cups (1 liter) loosely packed onions.

3.  Bring 1 quart (1 liter) of water to a simmer in the bottom of a steamer. Place the onions on the steaming rack.  Place the rack over simmering water, cover, and steam until the onions are al dente 5 to 6 minutes. Remove the basket from the steamer to drain the onions.  (This can be done 2 to 3 hours before serving.

4.  In a large dry skillet, brown the pancetta over moderate heat until crisp and golden, 3 to 4 minutes. With a slotted spoon, transfer the pancetta to several layers of paper towels to absorb the fat. Blot the top of the pancetta with several layers of paper towel to absorb any additional fat.5.  In a medium bowl combine the yogurt, nutmeg, onions, and half of the pancetta. Stir to blend.

6.  On a generously floured work surface, roll the dough into a 12- inch (30 cm) round.

7.  Sprinkle the wooden pizza peel with polenta and place the round of dough on the peel.  Working quickly to keep the dough from sticking, assemble the tart: Spread the yogurt mixture evenly over the dough. Sprinkle with the remaining pancetta.

8.  Slide the dough off the peel and onto the baking stone. Bake until the dough is crisp and golden, and the top is bubbly, about 10 minutes.

9.  With the metal pizza peel or large spatula, remove the tart from the baking stone. Sprinkle generously with pepper.  Transfer to a cutting board and cut into 8 wedges. Serve immediately.

Wine suggestion

A young, fresh dry Alsatian Riesling is in order here: Try one from the reputable firms of Ostertag or Zind-Humbrecht – crisp, dry, smoky wines with a saline touch of chalky minerality, an even match for the creamy onion and pancetta mixture offset with a hit of black pepper.   


This recipe were originally published in Salad as a Meal
All rights reserved. Please do not reproduce without permission.


Instant No-Knead Pizza + Bread Dough

RISE Pizza_D5A8267.jpg

This fool-proof, totally versatile no-knead dough is a staple in my kitchen. It can be made a few minutes ahead or days before. Made quickly in the food processor with instant yeast, it requires no kneading and is ready to use immediately for a rustic family pizza (page 283 of My Master Recipes), or with just a quick rise, for pinwheel loaves (page 285 of My Master Recipes) and focaccia (page 289 of My Master Recipes)fresh from your own oven!

Makes two 13-inch (33 cm) pizzas, 2 Pinwheel Loaves, or 1 Focaccia


Equipment

A measuring cup with a pouring spout; a food processor.

Ingredients

1 cup (250 ml) lukewarm water
2 tablespoons extra-virgin olive oil
3 cups (420 g) unbleached, all-purpose flour
1 package (about 2 teaspoons) instant yeast
2 1/4 teaspoons fine sea salt

Method

1.  In a cup with a pouring spout, combine the water and the oil.

2.  In the food processor, combine the flour, yeast, and salt. Pulse to blend. Add the liquid slowly through the feed tube, pulsing just before the dough forms a ball, 15 to 20 seconds. You may not need all the liquid. (If the dough is too wet, add a bit more flour. If it is too dry, add a bit more liquid).

3.  Transfer the dough to a clean work surface and form into a ball. The dough should be soft. Divide the dough into 2 equal balls. The dough can be used immediately, or can be stored in a airtight container refrigerated, for up to 5 days. Punch down the dough as necessary. 


This recipe was first published in My Master Recipes.
All rights reserved. Please do not reproduce without permission.

Grilled Polenta with Tomato + Onion Sauce

FriedPolentaTomatoOnion-126R0150.jpg

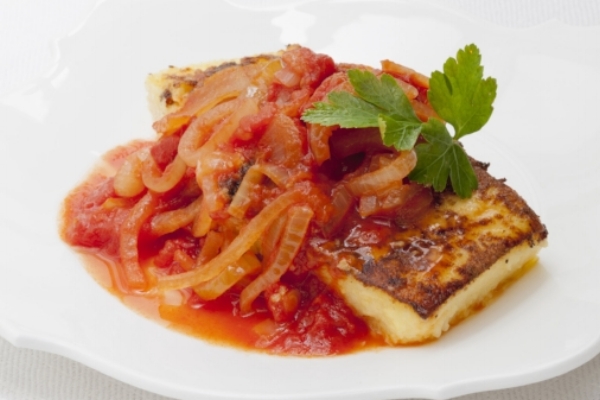
This light, colorful vegetarian weeknight dinner is a favorite, inspired by my annual visits to my “boot camp” Rancho la Puerta in Tecate, Mexico. This soothing, comfort-food dinner knows few rivals, particularly in cold weather.

4 servings


Equipment

A 1-quart (1 l) gratin dish, 4 warmed dinner plates.

Ingredients

3 cups (750 ml) 1 % milk
1/2 cup (125 ml) light cream or half-and-half
1 1/2 teaspoon fine sea salt
1/2 teaspoon freshly grated nutmeg
3/4 cup (135 g) instant polenta
1/2 cup (90 g) freshly grated Swiss Gruyère cheese, plus extra for garnish
1 large onion, peeled, halved lengthwise, and cut into thin half-rounds
1/4 cup (60 ml) extra-virgin olive oil
One 28-ounce (794 g) can peeled Italian plum tomatoes in juice
2 fresh or dried bay leaves
Fresh, flat-leafed parsley leaves, for garnish

Method

1.  In a large saucepan, bring the milk, cream, 1 teaspoon of the sea salt, and the nutmeg to a boil over medium heat. (Watch carefully, for milk will boil over quickly.) Add the polenta in a steady stream and, stirring constantly with a wooden spoon, cook until the mixture begins to thicken, about 3 minutes.

2.  Remove from the heat. Add half of the cheese, stirring to blend thoroughly.  The polenta should be very creamy and pourable. Pour it into the gratin dish. Even out the top with a spatula. Sprinkle with the remaining cheese. Let sit at room temperature for about 30 minutes to firm up. (Or store, covered and refrigerated, for up to 3 days.)

3.  Prepare the tomato garnish: In a large skillet, combine the onion, 2 tablespoons of the olive oil, and the remaining 1/2 teaspoon sea salt and sweat – cook, covered over low heat until soft and translucent – about 5 minutes. With a large pair of scissors, cut the tomatoes in the can into small pieces. Add the bay leaves and tomatoes and their juices and cook, covered, over low heat for about 15 minutes. Taste for seasoning.

4.  At serving time, heat 2 tablespoons of the oil in a large skillet until hot but not smoking. Cut the polenta into 8 even squares. Sear each square on both sides until golden, about 2 minutes per side. Transfer the squares to the warmed plates, stacking the second slice at an angle over the first. Spoon the sauce all over. Garnish with parsley and cheese.

WINE SUGGESTION

An inexpensive everyday dish suggests an equally fine but gently priced wine. A favorite is Michel and Stephane Ogier’s La Rosine Syrah, a deep purple vin de pays from the hillsides north of the old Roman town of Vienne.

MAKE AHEAD NOTE

Both the tomato sauce and the polenta can be prepared up to 3 days in advance, then covered and refrigerated separately. Reheat at serving time.

THE SECRET

When using whole, canned tomatoes, use a scissors to cut the tomatoes into small pieces, making for a still chunky yet finer


This recipe was first published in The French Kitchen Cookbook: Recipes and Lessons from Paris and Provence.

All rights reserved. Please do not reproduce without permission.